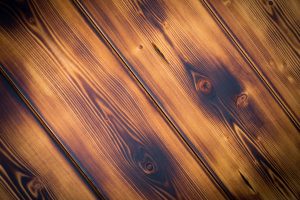
When it comes to repairing scratches and dents in hardwood floor, here are a few more tips for you. For minor scratches, you can use a hardwood floor touch-up pen or marker that matches the color of your floor. Just apply it to the scratch and gently blend it in. For deeper scratches or dents, you can try using a wood putty or filler. Apply it to the affected area, let it dry, and then sand it down until it’s smooth. After that, you can finish it off with a wood stain or sealant to match the surrounding hardwood floors. Remember to always follow the instructions on the products you use and take your time with the process. Let me know if you need any more help!
Here’s a step-by-step guide to repairing hardwood dents and scratches:
 1. Clean the area: Start by cleaning the scratched or dented area with a wood cleaner and a soft cloth. This will remove any dirt or debris.
2. Assess the damage: Take a closer look at the scratches and dents to determine their severity. Minor scratches can often be fixed with simpler methods, while deeper dents may require more extensive repairs.
3. Minor scratch repair: For minor scratches, you can use a hardwood floor touch-up pen or marker that matches the color of your floor. Apply it to the scratch and gently blend it in. Make sure to follow the product instructions for the best results.
4. Deeper scratch and dent repair: For deeper scratches or dents, you can use a wood putty or filler. Apply the filler to the affected area, making sure to fill it completely. Smooth out the excess filler using a putty knife or a scraper. Allow the filler to dry according to the manufacturer’s instructions.
5. Sanding: Once the filler is dry, gently sand the repaired area using fine-grit sandpaper. This will help to level the surface and create a smooth finish. Be careful not to sand too aggressively, as you don’t want to damage the surrounding wood.
6. Staining or sealing: After sanding, you may need to apply a wood stain or sealant to match the surrounding floor. Test the stain or sealant on a small, inconspicuous area first to ensure it matches the existing color. Apply it evenly to the repaired area using a brush or cloth, following the product instructions.
7. Finishing touches: Allow the stain or sealant to dry completely before walking on the repaired area. If necessary, apply additional coats for a more seamless blend.
Remember, the key to successful repairs is patience and attention to detail. Take your time and follow the instructions for each step. If you’re unsure about any part of the process, it’s always a good idea to consult a professional. It is also important to remember, just because your flooring looks like hardwood, does not necessarily mean it is. Luxury Vinyl Flooring can look very similar to hardwood floors depending on the pattern. So ensure its not Luxury Vinyl Flooring before starting the repair!
Still not feeling confident? Connect with one of our employees, and we can walk you through the different options!